Mesh asset
Switch to ScriptingA meshThe main graphics primitive of Unity. Meshes make up a large part of your 3D worlds. Unity supports triangulated or Quadrangulated polygon meshes. Nurbs, Nurms, Subdiv surfaces must be converted to polygons. More info
See in Glossary asset represents a mesh in your Unity project.
Usually, Unity creates mesh assets when it imports modelA 3D model representation of an object, such as a character, a building, or a piece of furniture. More info
See in Glossary, but you can also create mesh assets directly in Unity; for example, by creating a mesh with code and saving the results as an asset.
Mesh Inspector reference
Select a mesh asset in the Project windowA window that shows the contents of your Assets folder (Project tab) More info
See in Glossary to open the Mesh InspectorA Unity window that displays information about the currently selected GameObject, asset or project settings, allowing you to inspect and edit the values. More info
See in Glossary. This Inspector displays information about the mesh, such as the total number of vertices or the names of any blend shapes the mesh has. It also displays a visual preview of the mesh.
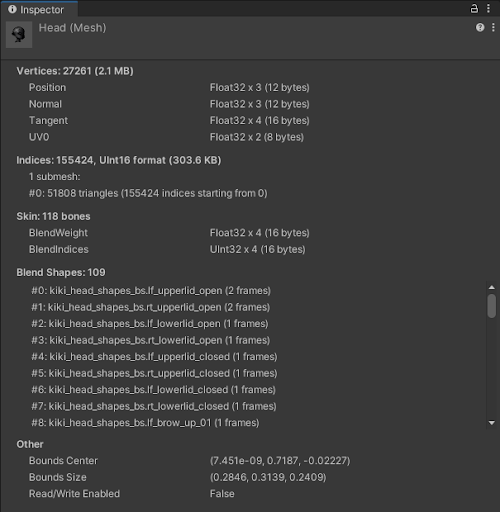
Mesh information
The Mesh Inspector displays information about how the mesh asset storesA growing library of free and commercial assets created by Unity and members of the community. Offers a wide variety of assets, from textures, models and animations to whole project examples, tutorials and Editor extensions. More info
See in Glossary its data, but not the values in the data itself. For example, the Inspector shows that Unity stores the value for Position as a set of three Float32 values for each vertex, but it doesn’t show the Position value of a specific vertex.
| Property | Description | |
|---|---|---|
| Vertices | The total number of vertices in the mesh, and how much on-disk storage and runtime memory Unity uses to store the vertex data for the mesh. For each vertex attribute, Unity shows how much on-disk storage and runtime memory Unity uses to store that attribute, and the data type that Unity uses for it. For more information about this data, see Mesh data. For information about how Unity can compress data in a mesh, see the Compressing mesh data. |
|
| Indices | The total number of indices in the mesh, how much on-disk storage and runtime memory Unity uses to store this data, and information about the indices for each sub-mesh. For more information about this data, see Mesh data. |
|
| Skin | This section is only visible on a skinned mesh. For more information about this data, see Mesh data. |
|
| BlendWeight | How many bones can affect a vertex. | |
| BlendIndices | The indices of the bones that affect skinned vertices. | |
| Blend Shapes | The total number of blend shapes in your mesh and lists their names. The number of frames next to each blend shape describes how many key frames each one has. | |
| Other | Shows additional information. | |
| Bounds Center | A bounding box describes where the outermost edges of a mesh lie. The “Bounds Center” stores the location of the center of the mesh’s bounding box. | |
| Bounds Size | Each value represents the length of the bounding box edges in X, Y and Z directions. | |
| Read/Write Enabled | The value of the Mesh.isReadable property, which determines whether Unity can access and modify certain mesh data at runtime. You can set this value with the Read/Write Enabled checkbox in the Model Import Settings window. |
|
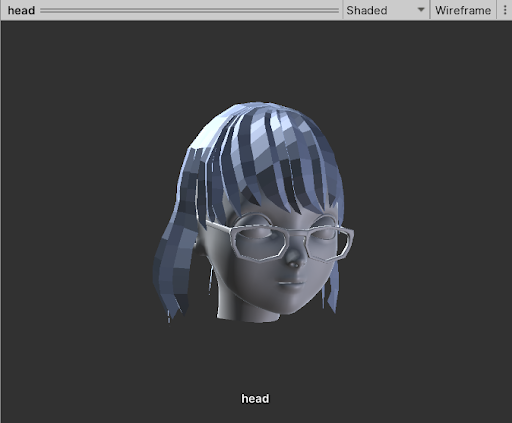
Mesh preview
This part of the Inspector allows you to preview the appearance of a mesh and explore the mesh data in a visual way.
You can use the following mouse and keyboard controls to navigate the mesh view:
- Rotate the view: left-click and drag.
- Rotate the light source: right-click and drag. A light source is present only in the “Shaded” and “Blendshapes” views.
- Pan the cameraA component which creates an image of a particular viewpoint in your scene. The output is either drawn to the screen or captured as a texture. More info
See in Glossary: middle-click and drag. - Zoom the camera in and out: scroll the mouse wheel.
- Reset the zoom and pan settings: hover the mouse cursor inside the preview and press the “F” key. This does not reset the rotation.
The “UV Layout” view displays the UV map of your mesh as a 2D image. Unity disables rotation in this view. To pan the camera, click and drag any of the left, right, or middle mouse buttons.
You can use the following properties in the UI(User Interface) Allows a user to interact with your application. Unity currently supports three UI systems. More info
See in Glossary to configure the view:
| Property | Description | |
|---|---|---|
| View mode | Provides different ways of visualizing the mesh. | |
| Shaded | Provides a visualization of the mesh with a basic light. This is the default view. For more information, see Shaded view. | |
| UV Checker | Applies a checkerboard texture to the mesh to visualize how the mesh’s UV map applies textures. For more information, see UV Checker view | |
| UV Layout | Displays how the vertices of the mesh are organized in the unwrapped UV map. This view disables the Wireframe toggle. For more information, see UV Layout view | |
| Vertex Color | Visualizes any vertex colors that the vertices in this mesh have. If no vertices have a vertex color, this menu item is disabled. For more information, see Vertex Color view | |
| Normals | Visualizes the relative directions of the normals in the mesh with color. For more information, see Normals view | |
| Tangents | Visualizes the tangent data in the mesh with color. For more information, see Tangents view | |
| Blendshapes | Lets you preview blend shape deformations to the mesh. If the mesh has no blend shapes, this menu item is disabled. For more information, see Blendshapes view | |
| Wireframe | Not available in UV Layout mode. If enabled, the preview displays a visualisation of the vertices and edges. Otherwise, it doesn’t. |
|
| Channel picker | Only available in UV Checker mode. This drop-down menu allows you to change which UV channel the preview displays. If the mesh only uses one UV channel, then only “Channel 0” is enabled. |
|
| Texture size | Only available in UV Checker mode. This slider allows you to change the size of the checkered texture on the mesh’s UV map. |
|
| Blend shape picker | Only available in Blendshapes mode. This drop-down allows you to change the blend shape that Unity visualizes in the mesh preview. When you select a different blend shape, Unity no longer applies the previous blend shape to the mesh preview. |
|
Each view displays the following data about the mesh underneath the preview of the mesh:
- The name of the mesh.
- The number of vertices in the mesh.
- The type and number of faces in the mesh. Most meshes use triangles to define faces.
- The number of blend shapes in the mesh, if any.
- The number of sub-meshes in the mesh, if there is more than one.
- The names of all UV maps in the mesh.
- For skinned meshes, the name of the skin weights property.
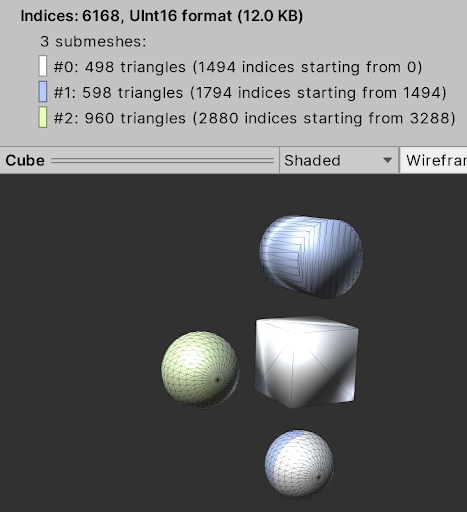
Shaded view
The Shaded view provides a visualization of the mesh with a basic light. When you import a mesh from a 3D modelling application, Unity separates the mesh into sub-meshes for each material on the mesh. Unity applies a different color to each sub-mesh in this view. You can find the legend for these colors under the Indices section of the Mesh Inspector. The following screenshot shows an example of this legend for a mesh with three sub-meshes, with the wireframe setting enabled.
UV Checker view
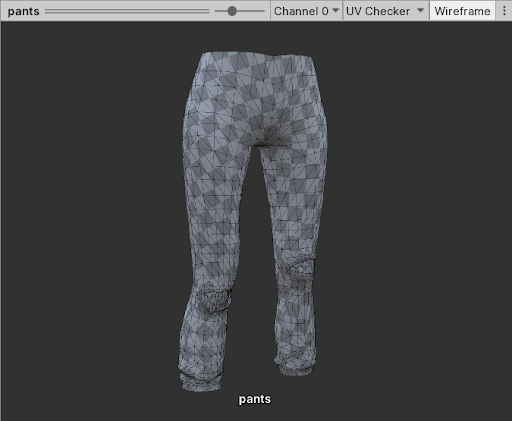
This view applies a checkerboard texture to the mesh to visualize how the mesh’s UV map applies textures. It also adds another dropdown menu next to the view picker menu. In the above screenshot, this new menu displays “Channel 0”. This dropdown allows you to check different UV channels when your UV map uses more than one channel.
To change the size of the checkerboard texture in this view, use the slider next to the channel picker dropdown menu. Changes to this slider don’t affect the settings in your UV map, only the texture size within this view. Use the slider to explore how different texture sizes look on the mesh.
UV Layout view
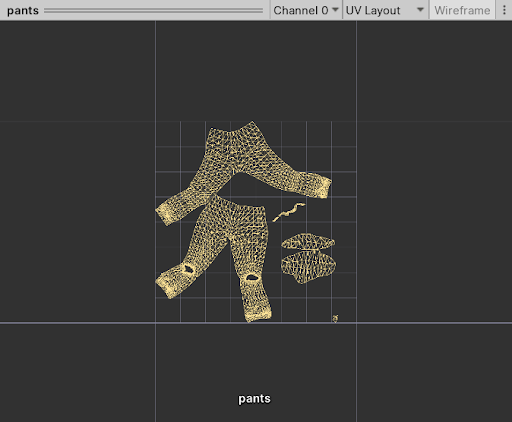
The UV Layout view view displays how the vertices of your mesh are organized in the unwrapped UV map. The wireframe toggle isn’t active in this view, because it already deals with vertices. Unity disables all camera controls except camera pan and zoom in this view.
By default, the UV Layout view displays the 0..1 UV range. You can access different UV channels with the channel picker dropdown menu.
Vertex Color view
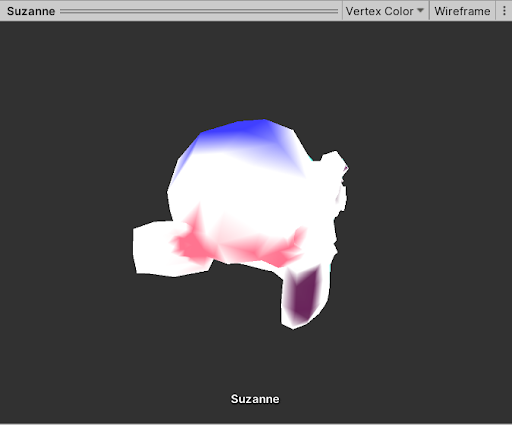
The Vertex Color view displays vertex colors in your mesh. Vertex colors are separate from any Materials the mesh has. For more information on vertex colors, see Mesh.colors.
Normals view
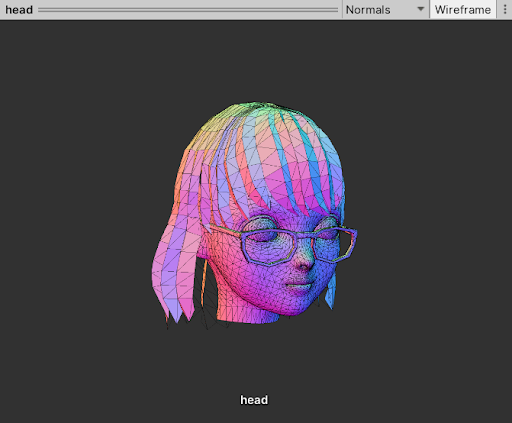
The Normals view uses color to visualize which direction the normals in the mesh face. The direction of a normal vector affects how light interacts with that part of the mesh.
Tangents view
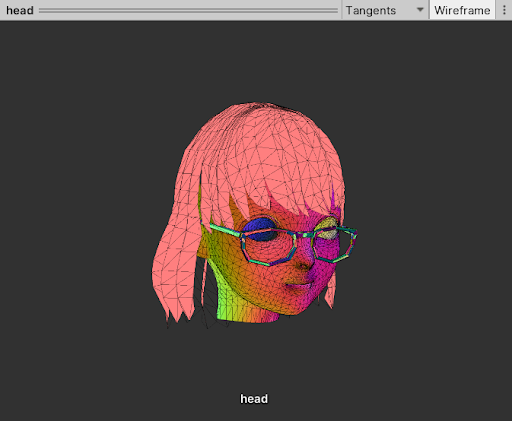
The Tangents view uses color to visualize tangent data in the mesh. Unity uses tangents as part of the workflow for bump-mapped ShadersA program that runs on the GPU. More info
See in Glossary.
Blendshapes view
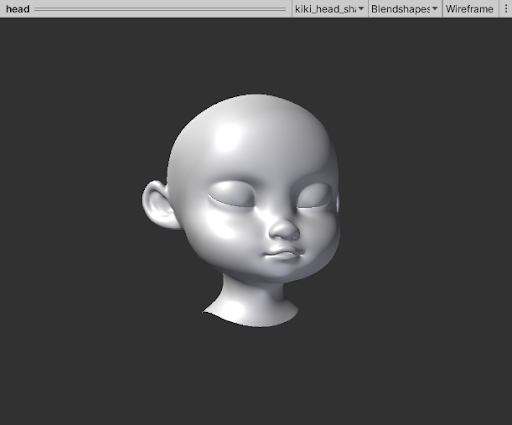
The Blendshapes view applies blend shape deformations to your mesh and displays the result in the preview window. You can preview one blend shape at a time; the view shows each blend shape at its highest value. This means that a preview of a blend shape that curves a character’s smile, for example, displays the curve at its maximum.
This view adds a new dropdown menu to select a blend shape next to the view picker dropdown. The dropdown menu lists all blend shapes in the current mesh. If the list cannot fit into a single screen, use the arrows at the top and bottom of the list to navigate through the full list.
Mesh