Building plug-ins for desktop platforms
Plug-ins for desktop platforms are libraries of native code you can write in C, C++ and Objective C. This page describes plug-insA set of code created outside of Unity that creates functionality in Unity. There are two kinds of plug-ins you can use in Unity: Managed plug-ins (managed .NET assemblies created with tools like Visual Studio) and Native plug-ins (platform-specific native code libraries). More info
See in Glossary for macOS, Windows, and Linux. For more information, refer to Native plug-insA platform-specific native code library that is created outside of Unity for use in Unity. Allows you can access features like OS calls and third-party code libraries that would otherwise not be available to Unity. More info
See in Glossary.
macOS plug-ins
You can deploy macOS plug-ins as bundles or, if you are using the IL2CPPA Unity-developed scripting back-end which you can use as an alternative to Mono when building projects for some platforms. More info
See in Glossary scripting backendA framework that powers scripting in Unity. Unity supports three different scripting backends depending on target platform: Mono, .NET and IL2CPP. Universal Windows Platform, however, supports only two: .NET and IL2CPP. More info
See in Glossary, loose C++ files, which you can invoke with [DllImport("__Internal")] syntax. For further information on loose C++ plug-ins refer to C++ source code plugins for IL2CPP.
To create the bundle project with Xcode:
- Open Xcode.
- Select File > New > Project > macOS > Framework & Library > Bundle.
For more information about working with Xcode, refer to Apple’s documentation on Xcode.
Requirements
- You can build your plug-in as a universal binary that’s compatible with 64-bit architectures. Alternatively, you can provide separate dylib files.
- If you are using C++ (
.cpp) or Objective-C (.mm) to implement the plug-in, declare the functions with C linkage to avoid name mangling issues:
extern "C"
{
  float ExamplePluginFunction ();
}
Windows plug-ins
Plug-ins on Windows are either .dll files with exported functions, or loose C++ files if you are using IL2CPP. You can use most languages and development environments that can create .dll files to create plug-ins. You must declare any C++ functions with C linkage to avoid name mangling issues.
Linux plug-ins
Plug-ins on Linux are .so files with exported functions. Although these libraries are usually in C or C++, you can use any language. You must declare any C++ functions with C linkage to avoid name mangling issues.
When you build the native plug-ins for Linux, if the built library has dependencies on another native plug-in, you must specify the rpath for that library while compiling it.
Add the linker flag -Wl, -rpath=$ORIGIN to specify the runtime search path. The linker flag instructs the loader to find its dependencies in the current directory of the library besides searching the system search path. You can add other linker flags along with -Wl, -rpath=$ORIGIN, however, Unity doesn’t control them. For example, /usr/bin/g++ -o binary.c.o -Wl,-rpath=$ORIGIN.
Alternatively, you can set LD_LIBRARY_PATH=dependency path in the environment to instruct the loader to search that path for dependencies. Linux doesn’t automatically search the current directory for dependencies. Make sure to set the correct dependency search path because incorrect path causes missing library errors in the Unity Editor.
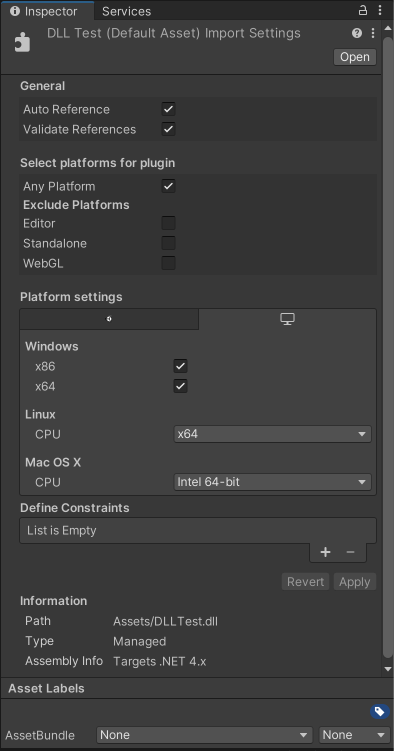
Managing plug-ins inside Unity
In Unity, the Plugin InspectorA Unity window that displays information about the currently selected GameObject, asset or project settings, allowing you to inspect and edit the values. More info
See in Glossary manages your plug-ins. To access the Plugin Inspector, select a plug-in file in the Project windowA window that shows the contents of your Assets folder (Project tab) More info
See in Glossary. For Standalone platforms you can choose the CPU architecture with which the library is compatible. For cross-platform plug-ins you must include the .bundle file (for macOS), the .dll file(for Windows), and the .so file (for Linux). Unity automatically picks the right plug-in for the target platform and includes it with the player. For further information, refer to Import and configure plug-ins.
Invoking your plug-in from a C# script
Place your built plug-in in the Assets folder or the appropriate architecture-specific sub-directory in your Unity Project. Unity then finds it by name when you invoke it from a C# script. For example: [DllImport ("PluginName")] private static extern float ExamplePluginFunction ();
Note: Don’t include the library prefix or file extension in thePluginName value. For example, if the actual name of the plug-in file is PluginName.dll on Windows or libPluginName on Linux, the value should be PluginName in both cases.
Example plug-ins
You can download and use these projects to learn how to implement plug-ins in Unity.
- Simplest Plugin Example: This project implements basic operations (for example, print a number, print a string, add two floats and add two integers). This project includes Windows, macOS and Linux project files.
-
Native Renderer Plugin: This is a low-level rendering plug-in that renders a rotating triangle from C++ code after all regular rendering is done and fills a procedural texture from C++ code, using Texture.GetNativeTexturePtr to access it. This project includes Windows, UWP, macOS, WebGLA JavaScript API that renders 2D and 3D graphics in a web browser. The Unity WebGL build option allows Unity to publish content as JavaScript programs which use HTML5 technologies and the WebGL rendering API to run Unity content in a web browser. More info
See in Glossary and Android files.