The 3D Game Kit allows you to create 3D platformer gameplay and puzzles in Unity without code. This document describes each component you can use in the Kit to create your game, including what the components do and what the settings in those components are.
If you are new to Unity, we recommend you go through our Platformer, FPS, Karting, or LEGO® Microgame tutorials to familiarize yourself with the Unity interface and concepts. You can also download the 2D Game Kit which will introduce you to the systems and concepts within a 2D environment. More information on Unity can be found on our Learn Site.
The best way to use this document is like a reference guide, searching by the component or setting you want to know more about. To learn the basics of how to use the Game Kit, check out the Quick Start Guide which provides a good foundation on using the Kit. The Start example game included in this project uses all the components we provided for gameplay. To get inspiration or an example of how to use a GameObject, explore levels 1 and 2 in the Scenes > GamePlay folder. Important terms and concepts are highlighted with links if you would like to find out more information about them.
The 3D Game Kit allows you to create 3D platformer gameplay and puzzles in Unity without code. This document describes each component you can use in the Kit to create your game, including what the components do and what the settings in those components are.
If you are new to Unity, we recommend you go through our Interactive Tutorials and Interface Essentials to familiarize yourself with the Unity interface and concepts. You can also download the 2D Game Kit which will introduce you to the systems and concepts within a 2D environment. More information on Unity can be found on our Learn Site.
How to Use This Document
The best way to use this document is like a reference guide, searching by the component or setting you want to know more about. To learn the basics of how to use the Game Kit, check out the Quick Start Guide which provides a good foundation on using the Kit.
The Start example game included in this project uses all the components we provided for gameplay. To get inspiration or an example of how to use a GameObject, explore levels 1 and 2 in the Scenes > GamePlay folder.
Important terms and concepts are highlighted with links if you would like to find out more information about them.
The Ellen Prefab is the Player character for the Game Kit. She can walk, run, jump and melee.
Standard movement controls
Motion
PC
Controller
Move
W, A, S, D
Left stick
Jump
Space
A
Melee
Left Click on Mouse
X
Camera
Mouse
Right stick
Ellen is put together using an Animator,Character Controller and Damageable script (see Step 6)as well as a number of custom scripts.
Player Controller
Select image to expand
Type caption for image (optional)
The Player Controller script holds all the information for how Ellen behaves in the game. The exposed settings here mostly control movement but you can tweak any of the variables within the script itself by opening it.
If you change any settings, the changes are only applied to the Prefab instance in that Scene. If you would like the changes to happen across all levels in your game, click Apply at the top of the instance for the change to be applied to the Ellen Prefab.
Max Forward Speed: Default Setting: 8 How fast Ellen can run.
Gravity: Default Setting: 20 How fast Ellen falls when in the air.
Jump Speed: Default Setting: 10 How fast Ellen takes off when jumping.
Turn Speed: Default Setting: Between 400 and 1200 How fast Ellen turns. This varies depending on how fast she is moving. When stationary, the maximum is used because you want Ellen to turn faster. When she’s not running at Max Forward Speed, the minimum is used because it’s harder to make sharp turns at speed.
Idle Timeout: Default Setting: 5 How many seconds before Ellen starts considering random Idle poses.
Can Attack: Default Setting: false Whether or not Ellen can attack with her staff. This can be set externally.
References: These are all the references the script requires to function. They are entirely found on the Ellen prefab and by default you should not need to adjust them.
Melee Weapon: Damages enemies when Ellen swings her staff.
Camera Settings: Gets the rotation of the current camera so that Ellen faces the correct direction. Note: This is the only reference which is not part of the Ellen prefab. It should automatically be set to the Camera Settings script of the CameraRig GameObject when the Prefab is instantiated.
Footstep Random Audio Player: Plays a random sound when Ellen takes a step.
Hurt Random Audio Player: Plays a random sound when Ellen gets hurt.
Landing Random Audio Player: Plays a random sound when Ellen lands.
Emote Landing Player: Plays a random vocal sound when Ellen lands.
Emote Death Player: Plays a random vocal sound when Ellen dies.
Emote Attack Player: Plays a random vocal sound when Ellen attacks.
Emote Jump Player: Plays a random vocal sound when Ellen jumps.
The instance painter component is a tool which is designed to assist you in the creation of your scene, inside the Unity Editor. It has no-use in Play mode or in a build. It allows you to paint prefabs across your scene, doing the placement of each instance for you.
Select image to expand
Type caption for image (optional)
Layer Mask: The instance painter will only paint on top of objects in these layers.
Root Transform: This is a Game Object under which all painted instances will be parented.
Brush Radius: The size of the brush around the mouse cursor.
Brush Height: The height of the brush around the mouse cursor.
Brush Density: A large value here will create more instances within your brush area, a lower value will create less.
Max Random Rotation: Painted instances will be randomly rotated within this range.
Rotation Step: If this value is greater than 0, the random rotation applied to the painted instance will be quantized to this value.
Collision Test: The painter will automatically remove intersecting instances when you are painting. It can do this using the volume specified by Renderer Bounds, or the Collider Bounds.
Max Intersection Volume: The percentage that each instance volume is allowed to intersect with other instance volumes.
Max Slope: The maximum gradient of the surface that the painter will use for positioning instances.
Prefab Palette: This is the list of prefabs which can be painted. Each prefab here will result in a button representing the prefab appearing in the inspector.
Align to Normal: If true, each painted instance will be oriented to the surface normal, otherwise will be oriented to the world up vector.
Follow Surface: If true, the brush will orient itself to the surface normal under the mouse cursor, otherwise will be oriented to the world up vector.
Randomize each Stamp: If true, the stamp (items that are placed within the brush area) will be randomized on each click. Otherwise, you will need to press the spacebar to create a new stamp.
Variations Panel: This panel is only visible on prefabs which have a variations component. This component allows a prefab to substitute itself with different versions and different scales.
Min Scale: Painted instances can be randomly scaled, this is the minimum of the scale range.
Max Scale: Painted instances can be randomly scaled, this is the maximum of the scale range.
Game Objects: The list of potential substitutes for this instance.
Pressure Pad
The pressure pad is automatically set up so that when the player walks on it, it lights up and plays a sound. You can connect the pressure pad to trigger events like opening a door.
Select image to expand
Type caption for image (optional)
The majority of the functionality for this prefab comes from two scripts:
Send On Trigger Enter: Generates all manner of gameplay interactions. This is part of the command system. The Send On Trigger Enter script fields are summarised below. For full details on using the command system, see the command system page.
Interaction Type: Default Setting: Open The type of command that the pressure pad will send. It functions purely as a label but is there to make sense of multiple interactions. If the pressure pad is used to open a door then Open would be a good choice. If it deactivates a trap, then Deactivate makes sense.
Interactive Object: This is the Game Command Receiver that will react to the pressure pad being used. For example, a door if the pressure pad is meant to open a door.
One Shot: Default Setting: true Whether the pressure pad can be used more than once. By default it can only be used once.
Cool Down: Default Setting: 1 How long before the pressure pad can be used again if it is not a One Shot. By default this setting has no effect.
On Send Audio: The audio source to play when the pressure pad is stepped on.
Audio Delay: Default Setting: 0 How long after the pressure pad is stepped on before the audio plays.
Layers: Default Setting: Player The layers that game objects can be on to activate the pressure pad. By default only Ellen can activate a pressure pad so the layer is set to just Player.
Interact On Trigger: Plays an animation when Ellen stands on the pad.
The Kit has 2 type of weapons: Melee and Range weapons.
Melee Weapon
Select image to expand
Type caption for image (optional)
The Melee Weapon is used on 3 objects in the game:
Ellen Staff
The Chomper (its bite is a melee weapon)
The Grenadier fist for its punch attack
A Melee weapon is composed of Attack Points which are spheres that define what part of the weapon causes damage. They are defined as an offset from a GameObject (called the Attack Root) and a radius for their size.
Attack points are visualised in the Scene View as white transparent spheres :
Select image to expand
Type caption for image (optional)
Range Weapon
Select image to expand
Type caption for image (optional)
The Range Weapon is used by:
The Spitter for its acid spit
The Grenadier for its bouncing grenade.
A Range weapon has two settings:
Muzzle Offset Where the projectile comes from. The Muzzle Offset is visualized in the SceneView as a yellow cross which helps position it.
Projectile Which projectile the weapon will launch.
Projectile
Projectile is a custom written script (inheriting from the Projectile class), but the Spitter Spit can be an easy way to do your own.
Select image to expand
Type caption for image (optional)
Shot Type: The type of projectile you want to use.
HIGHEST_SHOT: Makes the highest parabola based on the speed you set.
MOST_DIRECT: Makes the smallest parabola (i.e. most direct shot) based on the speed set.
LOWEST_SPEED: Makes a parabola between the shooting position and the target at the lowest speed possible (this setting is used in the kit).
Explosion Timer: If this is greater than zero, the projectile will explode only after that time. Otherwise, if less than 0, the projectile will explode on contact.
The Enemy Controller script is the base class for other more specific Enemy controller components. It contains the common properties for these specific components:
ChomperBehaviour
SpitterBehaviour
GrenadierBehaviour
It handles matching the NavMesh Agent and Animator. It can also have an arbitrary force set to it (e.g. used by the chomper/spitter when thrown after being hit).
Select image to expand
Type caption for image (optional)
Parameters
interpolateTurning: A flag which defines whether calling SetForward will immediately set the forward direction to the to the specified value, or gradually move towards the specified using a the speed specified by the navmeshAgent.angularSpeed field. If this flag is set to true, you need to call SetForward repeatedly across frames. Generally, this is done when you call SetForward manually through a Behaviour update.
applyAnimationRotation: When set to true, this applies animation root motion rotation.
Each behaviour (through SceneLinkedSMB usually - see next step) will switch between the Animator or the NavMesh Agent. By default, the NavMesh Agent has priority.
Navmesh Agent Priority
This is the default. Call SetFollowNavmeshAgent with true to reset priority to the NavMesh Agent.
In that mode, the navmesh agent will move the enemy, and the speed will be set to (animator.deltaPosition / Time.deltaTime).magnitude. This matches the speed of the NavMesh Agent to the speed of the animation.
Animator priority
This can be set by calling SetFollowNavmeshAgent with false. In this mode, the position will be set by the OnAnimatorMove function, based on the deltaPosition given by the animation.
For example, this is used by the Chomper attack animation instead of having to match the NavMesh path/direction to where and how far we want to attack.
External Force
Calling AddForce will give a force to the control to follow. With each FixedUpdate, Gravity is added to that force and the controller is moved by that amount. No friction is added to that, so the force will keep building. Its main purpose is to just push back the controller in a short burst.
Calling ClearForce will revert to the other modes.
Damageable is the component that allows you to make an object damageable by the weapons in the game. The layer on which the object is will determine which weapon can damage it (each weapon has list of layers it can damage).
InvulnerabilityTime is defaulted to 0. Any amount above 0 is, in seconds, the amount of time the damageable will ignore any damage for that duration once damage has been received.
HitAngle and HitRotation allows you to define the circle arc where attack can damage the object. By default the angle is set to 360 so an attack can damage from everywhere, but setting it to 180 for example will make the object only damageable in a half circle.
You can see a visualisation of the hit area from the red circle in the scene view when your damageable is selected
Example with the Grenadier, which can only be damaged from the back.
Select image to expand
Type caption for image (optional)
The different events can be used to trigger things when they happen. As an example, this is the death event for the breakable boxes:
Select image to expand
Type caption for image (optional)
We disable the box, enable its version made of multiple parts, set it at the right place by parenting and play a sound.
Checkpoints
Can be found in Prefabs > Scenes > Checkpoint, they can be placed in the scene and their colliders resized to make sure the player will enter them when moving through the level.
When the player die, it will be respawned at the last checkpoint it touched.
Note : the player will be respawned at the checkpoint position, so make sure it is above the ground
Damage Zone
Add that component to an object and scale the collider to create a zone in which, when any damageable object enter, they'll get damaged constantly of the setup damage amount.
Death Volume
Add that component and scale the collider to make a volume in which, as soon as the player enter it, they get killed. For example, it is used in the game for the water.
Contact Damager
Contact Damager is used mainly by enemy so they do damage on player when they get in contact with them. Just add it to a GameObject with a collider as trigger.
Note: It is separate from other damaging scripts because it uses a layer system to define what it can damage. This is because for the trigger event to be generated, the object that have that component need to be in a layer that collide with the player. But the enemy layer does not collide with the player (so enemies don't block player movement), so that script need to be added to a child object of the enemy that have a different layer (one that collide with the player) and it's damagedLayer setting must contain the Player Layer
Scenelinked SMB
SceneLinkedSMB is a script that allows you to have an easy fast reference to a MonoBehaviour from a StateMachineBehaviour. Although SceneLinkedSMBs can be used wherever you need to reference a specific MonoBehaviour, they were designed with the idea of separating logic and functionality. An animator controller contains a state machine which is ideal for controlling flow of execution. Using SceneLinkedSMBs you can make calls to public functions on a MonoBehaviour allowing it to control functionality because it can more easily obtain scene references. In this way, SceneLinkedSMBs can control logic as part of a state machine and the MonoBehaviours they are linked to control functionality.
To create a Behaviour using the SceneLinkedSMB:
Create a class that inherits from SceneLinkedSMB with its Generic parameter being the type of MonoBehaviour you want to access in it. For example, for Chomper:
SceneLinkedSMB<ChomperBehaviour>
Initiate the SceneLinked behaviour in each object using them. For example, in our ChomperBehaviour script Start function, call:
The Target Scanner is a simple class that enemies use to detect whether they can see the player.
Parameters
height Offset: The height at which the "eyes" of the character is using the scanner. When set to 0, the raycast has an unobstructed line of sight at the start of the object pivot. The height Offset is displayed as a yellow wire sphere in the Scene view.
detection Radius: The radius around the object in which the scanner can detect the player. The detection Radius is displayed as a blue circle in the Scene view.
detection Angle: The angle from the object facing the player in which the scanner can detect the player. For example, a value of 90 gives the scanner is a narrow view cone in front of the player. The blue circle arc in the Scene view represents the zone that corresponds to that angle with the above detection radius value.
max Height Difference: The maximum difference in height between the object pivot and the player pivot where the scanner can detect the player. This is useful if you don't want enemies on planes above or under the player (but still in direct line of sight) to start running after the player.
viewBlockerLayerMask: A Layer mask of what is considered to be "blocking" the view of the scanner. The line of sight raycast will be done only against objects in those layers.
Usage
Use the Target Scanner as a member of the Monobehaviour, and call Detect when you want to do a Detection check. It will return the PlayerController if it's visible, null otherwise.
See ChomperBehaviour.cs function FindTarget for an example.
The Game Kit contains a command system to connect gameplay elements together. It works using three key scripts: SendGameCommandSendGameCommand, GameCommandReceiveGameCommandReceive and GameCommandHandlerGameCommandHandler.
The SendGameCommandSendGameCommand script decides when something should happen - for example, when the character steps on a pressure pad. It then sends a 'command' which has a specific type, such as Activate, Close, Stop.
This command is then received by GameCommandReceiverGameCommandReceiver script. This script has a collection of different actions that should happen for any given command that it receives. For example, when receiving an Activate command, it performs an action on three handlers that were interested in that particular command.
The GameCommandHandlerGameCommandHandler is where the results of the command are. It might do something like turn a GameObject on or play a sound. It is important that the GameCommandHandlerGameCommandHandler script is on the same GameObject as the GameCommandReceiverGameCommandReceiver script for its reaction. This is how the GameCommandReceiverGameCommandReceiver registers its interest in a particular command.
There are several things that can cause a commend to be sent and so there are several classes which inherit from SendGameCommandSendGameCommand to cover these cases. These include: SendOnBecameInvisibleSendOnBecameInvisible, SendOnBecameVisibleSendOnBecameVisible, SendOnCollisionEnterSendOnCollisionEnter, SendOnCollisionExitSendOnCollisionExit, SendOnCollisionStaySendOnCollisionStay,SendOnTriggerEnterSendOnTriggerEnter, SendOnTriggerExitSendOnTriggerExit and SendOnTriggerStaySendOnTriggerStay.
There are also several results that can be caused by a command and so there are several classes which inherit from GameCommandHandlerGameCommandHandler. These classes include: MovingPlatform, TriggerUnityEvent, ToggleGameObjectActive, SwitchMaterial, StartPlayableDirector, SimpleTransformer, SimpleRotator, SimpleTranslator, SetGameObjectActive, SetAnimatorTrigger, RespawnPlayer, PlaySound, PlayAnimation, ParticleSystemEmitMovingPlatform, TriggerUnityEvent, ToggleGameObjectActive, SwitchMaterial, StartPlayableDirector, SimpleTransformer, SimpleRotator, SimpleTranslator, SetGameObjectActive, SetAnimatorTrigger, RespawnPlayer, PlaySound, PlayAnimation, ParticleSystemEmit and GameplayCounterGameplayCounter. Note that GameCommandHandlerGameCommandHandler is abstract and so never exists as itself but instead as one of the listed inheriting classes.
For example, if you want a door to open when Ellen stands on a pressure pad, use a SendOnTriggerEnterSendOnTriggerEnter script to send an Open command to a GameCommandReceiverGameCommandReceiver script when Ellen stands on a pressure pad. The door should animate and make a sound when it opens, so it makes sense to have a SetAnimatorTrigger scriptSetAnimatorTrigger script and a PlaySoundPlaySound script that listen to the GameCommandReceiverGameCommandReceiver.
Send Game Command
This is the base class for generating commands. As an example, the DoorHuge prefab uses this class to activate a grenadier (open the Assets > 3DGamekit > Scenes > Level1 scene and select the Level01Gameplay > DoorHuge in the Hierarchy window).
Select image to expand
Type caption for image (optional)
Interaction Type:Default Setting: None Identifies the type of command to be sent. This is only used for labeling and has no impact on the end effect of the command (a command to open a door could just as easily use the type Spawn as Open so long as the handler was set to react to Spawn). The different types are: None, Activate, Deactivate, Open, Close, Spawn, Destroy, Start, Stop.
Interactive Object: This is the Game Command Receiver that collects the different handlers of various commands.
One Shot:Default Setting: false Whether or not this command can be sent more than once.
Cool Down:Default Setting: 1 If this is not a One Shot command then this determines how long before the command can be sent again.
On Send Audio: This can optionally be set to an Audio Source, such sending the command plays an audio clip. You can assign any GameObject that has an Audio Source component to this slot.
Audio Delay: Default Setting: 0 If there is an Audio Source set in On Send Audio, this determines how long after the command is sent that the audio plays.
For more information, see Send Game Command sub-types.
Game Command Receiver
This script has a collection of Game Command Types and the handlers that listen for each of them. It is the organising system that connects commands being sent and handled.
Select image to expand
Type caption for image (optional)
You don’t need to set any fields for this script. The commands that are sent to this receiver are controlled by the various Send Game Command scripts, and the handlers that listen for those commands are controlled by the various Game Command Handler scripts.
Game Command Handler
This is the abstract base class for handling commands. Because the class is abstract, it does not exist in its base form but, instead, as one of its child classes. However, all Game Command Handlers have the following fields in common:
Interaction Type:Default Setting: None Identifies the type of command to be listened for. It is only used for labeling and has no impact on the end effect of the command (a handler to open a door could just as easily use the type Spawn as Open so long as the sender was also set to send a Spawn command). The different types are: None, Activate, Deactivate, Open, Close, Spawn, Destroy, Start, Stop.
Is One Shot: Default Setting: false Whether or not this reaction can happen more than once.
Cool Down: Default Setting: 0 If this is not a One Shot handler then this determines how long before this handler can be triggered again.
Start Delay: Default Setting: 0 Determines how long after receiving a command that the command is handled.
For more information, see Game Command Handler Sub-types.
Send Game Command Sub-types
The following subsections are classes that you can use instead of the Send Game Command script. Each class contains the Send Game Command fields, and some have additional fields.
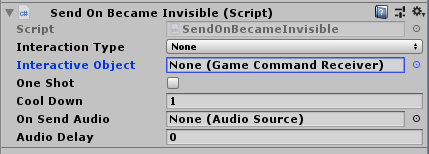
Send On Became Invisible
When a Game Object is no longer visible in any camera in the scene, this component will activate and send a command. This script sends its command from the OnBecameInvisible call of the MonoBehaviour class. This script has no additional fields.
Select image to expand
Type caption for image (optional)
Send On Became Visible
When a GameObject becomes visible in any camera in the scene, this component will activate and send a command. This script sends its command from the OnBecameVisible call of the MonoBehaviour class. This script has no additional fields.
Select image to expand
Type caption for image (optional)
Send On Collision Enter
When a GameObject has a collision with another object that is in the specified layer(s), this component will activate and send a command. This script sends its command from the OnCollisionEnter call of the MonoBehaviour class.
Select image to expand
Type caption for image (optional)
Layers: A LayerMask for the layers of GameObjects which count for the collision to send the command.
Send On Collision Exit
When a GameObject has a collision with another object that is in the specified layer(s) and then exits that collision, this component will activate and send a command. This script sends its command from the OnCollisionExit call of the MonoBehaviour class.
Select image to expand
Type caption for image (optional)
Layers: A LayerMask for the layers of GameObjects which can cause a collision that triggers the component to send a command.
Send On Collision Stay
When this Game Object has a collision with another object that is in the specified layer(s), this component will activate after the SendOnCollisionEnter component has activated and the object is still in a collision state. This script sends its command from the OnCollisionStay call of the MonoBehaviour class.
Select image to expand
Type caption for image (optional)
Layers: A LayerMask for the layers of GameObjects which can cause a collision that triggers the component to send a command.
Send On Trigger Enter
If this component is attached to a trigger collider, a collision with another object that is in the specified layer(s) will cause it to activate and send a command. This script sends its command from the OnTriggerEnter call of the MonoBehaviour class.
The following image shows a pressure pad with a cube trigger. The Send Open shows the command that is sent, and the white arrows are leading toward the target object.
Select image to expand
Type caption for image (optional)
Layers: A LayerMask for the layers of GameObjects which can cause a collision that triggers the component to send a command.
Send On Trigger Exit
If this component is attached to a trigger collider, a collision with another object that is in the specified layer(s) will cause it to activate and send a command when the game object leaves the collision area. This script sends its command from the OnTriggerExit call of the MonoBehaviour class.
Select image to expand
Type caption for image (optional)
Layers: A LayerMask for the layers of GameObjects which count for the trigger event to send the command.
Send On Trigger Stay
If this component is attached to a trigger collider, a collision with another object that is in the specified layer(s) will cause it to activate and send a command every frame that the game object is inside the collision area. This script sends its command from the OnTriggerStay call of the MonoBehaviour class.
Select image to expand
Type caption for image (optional)
Layers: A LayerMask for the layers of GameObjects which count for the trigger event to send the command.
The following subsections are specialised components which have the Game Command Handler functionality, and list extra fields that are used in addition to the common Game Command Handler fields.
Moving Platform
Use this component to control platforms that move on predictable paths. Find it in the Project window in Prefabs > Interactables. For details on this type of Game Command Handler, see the tutorial page on moving platforms.
Interact On Trigger Health Crates
A good use case example of an Interact On Trigger is the Health Crate prefab, which increases the player’s health when the player damages it. Find it in the Project window in Prefabs > Interactables. The HealthCrate prefab uses the Interact On Trigger script:
Select image to expand
Type caption for image (optional)
When first instantiated, one of the events in the Interact On Trigger script is missing. On this event, the player needs to be told its health is getting reset. To do this, select Ellen from the scene as the GameObject to call a function on. Then from the function drop-down menu, select Damageable > ResetDamage().
Now, whenever Ellen bumps into the Health Crate in the scene, her health will reset to full.
Trigger Unity Event
This class calls a Unity Event when the command is sent.
Select image to expand
Type caption for image (optional)
Unity Event: The event to call when the command is sent.
Toggle Game Object Active
This class switches the active state of a collection of GameObjects. If each GameObject is active, then it switches to inactive; if each is inactive, then it switches to active.
Select image to expand
Type caption for image (optional)
Targets: The collection of GameObjects to have their active state switched.
Switch Material
This class changes the appearance of a GameObject by cycling the material of its renderer.
This command is a GameCommandReceiver, which switches materials on the target object. Each time the command is received, the next material in the materials list is applied. When the last material is reached, the first material will be used as the next material.
Select image to expand
Type caption for image (optional)
Target: The Renderer that will have its material cycled.
Materials: The Materials to cycle through. The material at index 0 should be the default material of the renderer. This is because the first time a command is handled, the material at index 1 is used.
Start Playable Director
This class starts a Timeline when a command is handled. It also has events that are called when the Timeline starts and finishes playing.
Select image to expand
Type caption for image (optional)
Director: The Playable Director that references the Timeline to be played.
On Director Play: The event that is called just before the Timeline starts playing.
On Director Finish: The event that is called just after the Timeline finishes. This works using a timed Invoke. If something changes the duration of the timeline or pauses it without changing the Time.timeScale then the event might not coincide with the end of the Timeline.
Simple Rotator
This class rotates a GameObject when using an animation seems like overkill. This command is a GameCommandReceiver. When the specified command is received, it will perform a rotation on the transform.
Select image to expand
Type caption for image (optional)
Loop Type: Default Setting: Once This controls what the GameObject does when the full duration has been reached.
Once The rotation will not repeat.
PingPong The GameObject will rotate back and forth around its axis.
Repeat The GameObject will restart from the beginning each time it reaches its duration.
Duration:Default Setting: 1 The length of time in seconds to perform the rotation.
Accel Curve: How the rotation speed varies over time.
Activate:Default Setting: false Whether the command has been received and the GameObject is currently rotating.
On Start Command: The command to send when the rotation starts.
On Stop Command: The command to send when the rotation finishes.
On Start Audio: The audio to play when the rotation starts.
On Stop Audio: The audio to play when the rotation stops.
Preview Position: Start previewing the behaviour of the component at the specified position.
Axis:Default Setting: (0, 0, 1) The axis in local space around which the GameObject will rotate.
Start:Default Setting: 0 The number of degrees around the axis at which the GameObject will start its rotation.
End:Default Setting: 90 The number of degrees around the axis at which the GameObject will end its rotation.
Simple Translator
This class moves a GameObject’s rigidbody from a specified Start position to a specified End position. This command is a GameCommandReceiver. When the specified command is received, it will perform a translation on the transform.
The following image shows a GameCommandReceiver. The Recv Open label is telling us that this GameObject will react when a Open command is received. The white arrows show the direction of the incoming command.
Select image to expand
Type caption for image (optional)
Select image to expand
Type caption for image (optional)
Loop Type:Default Setting: Once This controls what the GameObject does the full duration has been reached.
Once The movement will not repeat.
PingPong The GameObject will move back and forth along its path.
Repeat The GameObject will restart from the beginning each time it reaches its duration.
Duration:Default Setting: 1 The length of time in seconds to perform the movement.
Accel Curve: How the speed varies over time.
Activate:Default Setting: false Whether the command has been received and the GameObject is currently moving.
On Start Command: The command to send when movement starts.
On Stop Command: The command to send when movement finishes.
On Start Audio: The audio to play when movement starts.
On Stop Audio: The audio to play when movement stops.
Rigidbody: The rigidbody component of the GameObject to move. The rigidbody to move should not be on the same GameObject as this script. Generally, the rigidbody would be a child of this script's GameObject. The rigidbody will be moved relative to this script's GameObject.
Start:Default Setting: (0, 0, -1) The position in local space that the rigidbody will start to move.
End:Default Setting: (0, 0, 1) The position in local space that the rigidbody will stop moving.
Set GameObject Active
This class works similarly to the ToggleGameObjectActive class except instead of switching back and forth, the active state of each GameObject is set to the same value.
Select image to expand
Type caption for image (optional)
Targets: The GameObjects to have their active state set.
Is EnabledDefault Setting: true The active state that the target GameObjects will be set to.
Set Animator Trigger
This class sets an Animator trigger parameter when a command is received.
Select image to expand
Type caption for image (optional)
Animator: The Animator component to set the trigger parameter on.
Trigger Name: The name of the trigger parameter to set.
Respawn Player
This class simply calls the Respawn function of the Player Controller. This will cause the scene to fade out and Ellen to be taken back to the last checkpoint.
Select image to expand
Type caption for image (optional)
Player: Reference to the PlayerController script on Ellen.
Play Sound
This class plays the audio clips assigned to a collection of audio sources. The audio sources need to be set up separately.
Select image to expand
Type caption for image (optional)
Audio Sources: The sources to play when a command is received.
Play Animation
This class plays the animation clips assigned to a collection of animation components. The animation components themselves need to be set up separately.
Select image to expand
Type caption for image (optional)
Animations: The animation components to have their animations played when a command is received.
Particle System Emit
This class causes a collection of particle systems to each emit a specified number of particles.
Select image to expand
Type caption for image (optional)
Particle Systems: The particle systems to emit particles when a command is received.
Count: The number of particles to be emitted by each particle system.
Gameplay Counter
This class works slightly differently from other GameCommandHandlers. It is instead an intermediary step when something needs to happen multiple times before the command is handled. It works by counting the number of times the selected command is received and, when the required count is reached, a designated GameCommandHandler performs its interaction.
Select image to expand
Type caption for image (optional)
Current Count:Default Setting: 0 How many commands have been received so far.
Target Count:: Default Setting: 3 How many commands are required before the GameCommandHandler performs its interaction.
On Increment Send Command: An optional command that can be sent whenever the count is incremented. The command is not be sent when the Target Count is reached.
On Increment Perform Action: An optional handler that can perform its action whenever the count is incremented. The action is not be performed when the Target Count is reached.
On Target Reached Send Command: An optional command that can be sent when the Target Count is reached.
On Target Reached Perform Action: An optional handler that can perform its action when the Target Count is reached.
Simple FX Synth
The SimpleFXSynth component is used to generate AudioClips for game sound effects.
Select image to expand
Type caption for image (optional)
Fx Name When in Play mode, the Fx Name field is used to share the AudioClip among all SimpleFXSynth instances. This means each unique sound effect should have a unique Fx Name.
Duration: Controls the length, in seconds, of the AudioClip.
Layers: A stack of SynthLayer objects. Each SynthLayer object has an oscillator, with frequency and volume envelopes that are applied over the duration of the AudioClip. Output from the oscillator is fed into a filter which has cutoff and resonance envelopes that are also applied over the duration of the AudioClip.
Audio: The Audio Source that will play the AudioClip.